Part Maintenance |

|
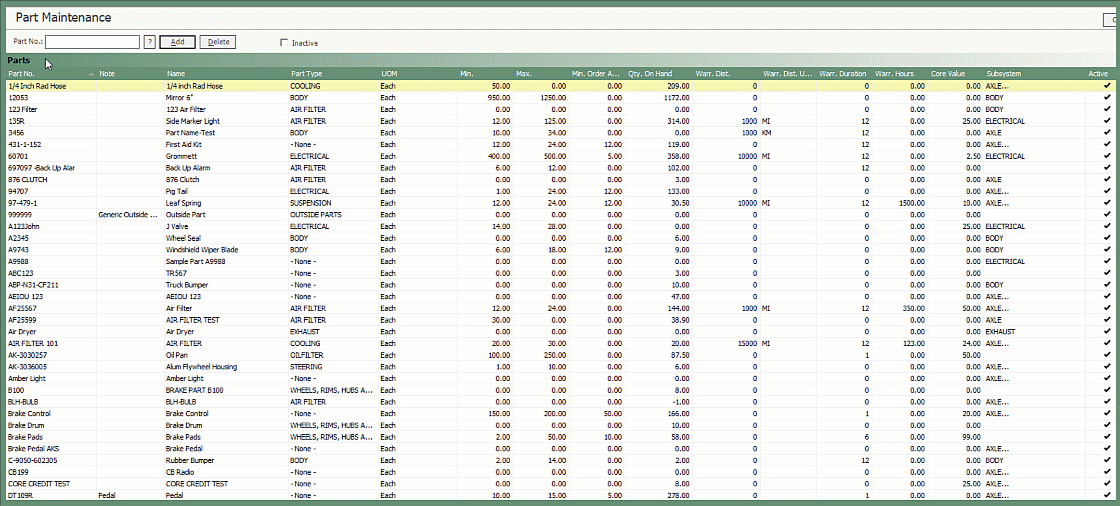
Part Maintenance is the main center for adding and storing active and inactive parts, inventory, warranties and asset associations.
Prior to adding parts, there will need to be part codes established in Code Maintenance. See details here.
|
Navigate To: Parts>Part Maintenance OR Click the Tire Shortcut |

|


-
All active parts will display by default. Select the Inactive box above the grid to include inactive parts in the grid.
-
Sort the grid by any column header.
-
To locate a specific part in the grid, enter the part number in the Part No. box and press enter. The focus in the grid will be directed to the part number entered.
-
Click the question mark to search for an active or inactive part by number, name, type or vendor.
-
Double click on a part in the grid to open and modify.
-
To Delete a part in the grid, select the part and click Delete. If the part has been used and dependencies are detected, the part cannot be deleted.
All inventory and non inventory parts need to be created in part maintenance .
|
|
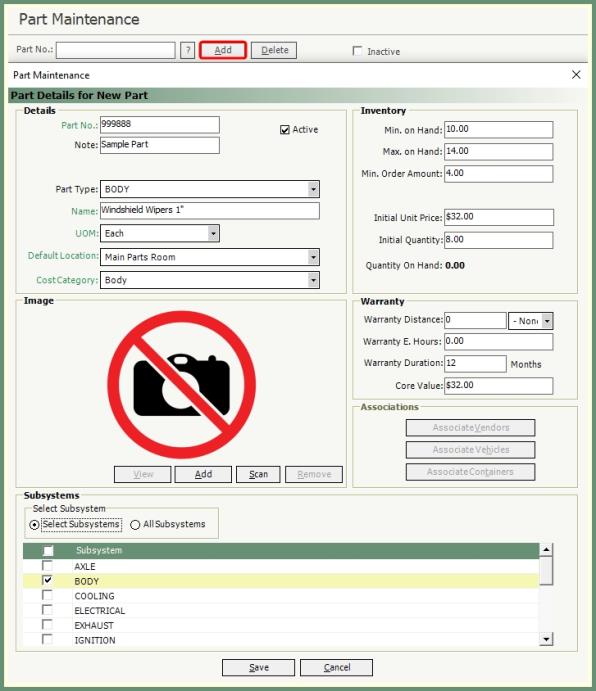
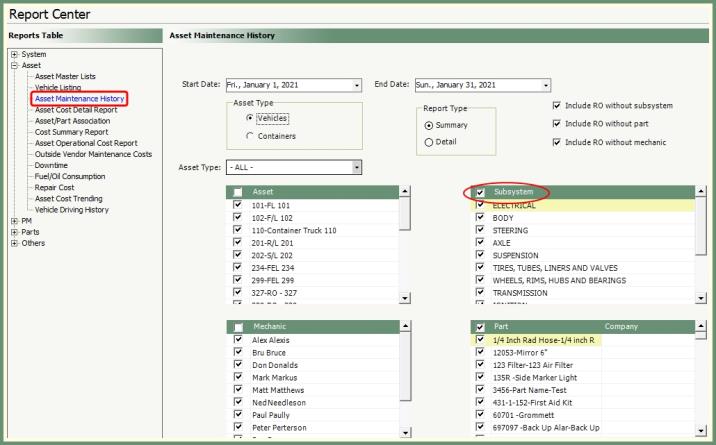
Apply a single or multiple subsystems as a link to associate parts used on repair order. Subsystems can be used as a filter on various reports.
|

|
|
-
Select a single or multiple subsytems to link this part to.
-
If All Subsystems is selected, the user will be prompted to select a subsystem each time the part is used on a repair order.
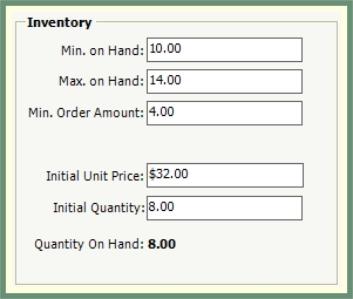
Populate the inventory numbers for the part as per the field descriptions. Inventory counts will be applied on various reports.
|

|
-
Enter the Minimum on Hand quantity. When inventory parts are at or below the minimum, they will appear on the homepage as Parts Under Minimum Inventory Level.


-
Enter the Maximum on Hand quantity. If the order placed is above the maximum on hand quantity, the user will receive a warning message.
-
Enter the Minimum Order Amount. If the order placed is below the minimum on hand quantity, the user will receive a warning message.
-
Only populate the Initial Unit Price and Initial Quantity upon your initial startup using Maintain It. These fields should remain as a reference going forward.
-
Upon save, the Quantity on Hand will update and be available for reference when the part is recalled.
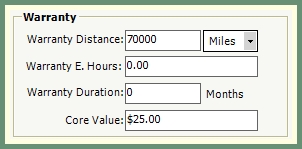
If a warranty applies to this part, populate the warranty conditions. As warrantied parts are applied to repair orders, the warranty conditions will be assessed against the current asset and prompt the user if applicable.
|
|
|
-
Enter the warranty conditions by distance, engine hours, duration by months or a combination of conditions.
-
If the part is used on an asset and the warranty conditions are met, the user will receive a prompt to apply the warranty.
-
Save the part when finished.
-
The part and details will be added to the grid and populate the columns as described.
-
A record will be created for this warranty part in Credit Reconciliation.
Apply a core credit when applicable to a part if a return credit is expected from the vendor when this part is replaced on a repair order.
|

|
 |
-
Enter the credit amount in the core value field.
-
When this part is applied to a repair order, the core credit will automatically apply when the core value field is populated.
-
If the core value field is not populated on the part, the core field and credit can be selected manually during a repair order.
-
Core Credit(s) for all parts on a repair order will be summarized to the right of the parts grid.
-
A core credit record will be created for this part in Credit Reconciliation.
For example, a Core Value of $25.00 exists for a Tire. When this tire is replaced on a repair order and the old tire is sent to the vendor for credit, the vendor issues you $25.00 which can be processed through Credit Reconciliation.
Following warranty and core credits on parts, these credits can be managed and processed upon receiving the credit from the vendor.

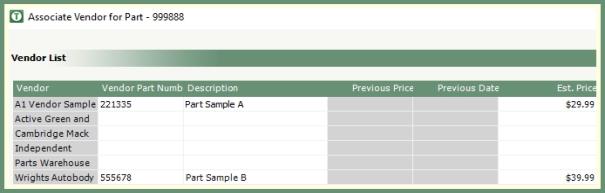
Vendors, Vehicles and Containers can be associated to a saved Part.

|
|
|
|
-
Double click on a part to recall or right click on a part in
the grid.
-
Click Associate Vendors to add associated vendor part numbers, description and estimated price for vendors your company orders this part from. This will reduce the parts list when the vendor is selected.
-
Previous Price and Dates will populate if they exist.
-
Only select Auto Fill to apply the Maintain It Part Number to all vendors in the grid.
-
Click Associate Vehicles to select vehicles associated with this part. Save when finished.
-
Click Associate Containers to select containers associated with this part. Save when finished.
Generate labels per part by selected vendor printed to the designated label printer.
-
Right click on a part in the parts grid.
-
Enter the number of labels to print.
-
Select a vendor from the drop down.
-
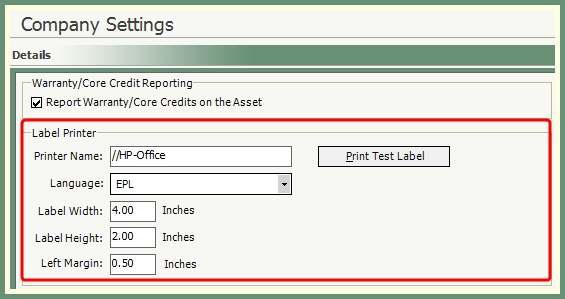
Click Go. The labels will be printed to the Label Printer setup in Company Settings.